Pixelink Cameras and IP addresses
Network based Pixelink cameras (currently, only cameras with a Gigabit Ethernet interface) must have a valid IP address assigned to it in order to function correctly. This tool can be used to manage the IP address assignment for our PL-B and PL-X series GigE cameras. The program has two operational modes; dialog based interactive mode, and command line based mode. Both modes of operation will allow you to manage IP address assignment using either dynamic (or automatic) IP address assignment, or static IP address assignment.
Static vs. Dyanmic IP Address Assignment
Dynamic IP Address Assignment, or what Microsoft Windows refers to as automatic, is the technique used by the camera by default. That is, the camera will query the network to which it is attached, to try to assign itself an IP address appropriate for the network. Should your network have a DHCP (Dynamic Host Configuration Protocol) server, then the camera will receive IP configuration information from the server. In the absence of a DHCP server, the camera will use LLA (Link-Local Address) to assign itself an IP address. It’s noteworthy that the LLA process can take up to a minute to resolve an IP address, so DHCP is generally the preferred technique for dynamic IP address assignment. A camera which has used LLA to determine its network address, can be identified by having an address on the 169.254.0.0/16 IP subnet (having an IP address of 169.254.ddd.ddd and a subnet mask of 255.255.0.0).
Static IP Address Assignment requires the user to assign the IP configuration to the camera (using this tool). This technique requires more network knowledge, and is typically only used in point-to-point connections, or in very small networks.
If you are unclear on what IP address assignment technique to use, or what IP address to assign, looking at the "Internet Protocol (TCP/IP) Properties" page within Windows is a good place to start (found under Start => ControlPanel => Network Connections => Properties of your NIC => Internet Protocol (TCP/IP) Properties).

In Windows 10, the IP Properties Page can be found under Start -> Settings -> Network and Internet
Next, select Ethernet, and click Change Adapter Options

Right click on the Ethernet connection that you're connected to, and select Properties

Scroll down the list and select Internet Protocol Version 4, and then click Properties:

This will bring you to the IP Properties window:

If your NIC is set to "Obtain an IP address automatically", then your camera should be usable without any further configuration, as it too will use Dynamic IP address assignment. However, if your NIC is set to "Use the following IP address" (as shown in the very first screenshot), then you will have to use static IP address assignment for your camera.
Choose an IP address which is not being used by any other device on the network. Choosing an IP address which is one greater than the NICs IP address is often a good choice (EG. If the NICs IP Address is: 192.168.1.10 => use IP Address: 192.168.1.11). You should set the cameras subnet mask and default gateway to the same values used by the NIC (the defaults used by this program).
Locating the IP Address Assignment Tool
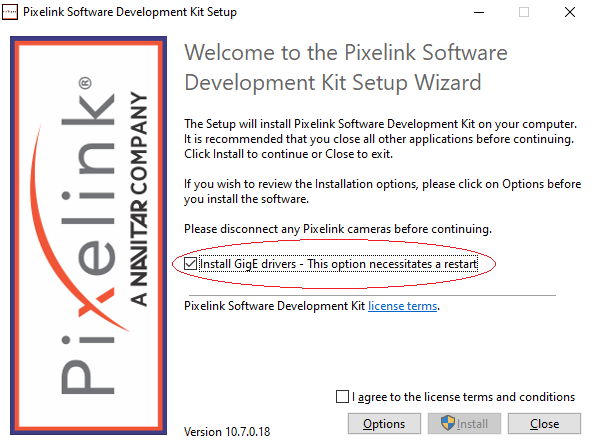
The IP Address Tool (PxLlpAddress.exe) can be found in the Tools folder after installing Pixelink Capture or the Pixelink SDK, if the option to install GigE Drivers is selected during installation. The default location for the Tools folder is:
C:\Program Files\PixeLINK\Tools\PxLlpAddress.exe
If you are unable to find the IP Address Tool, please uninstall the Pixelink camera software (Pixelink Capture or the SDK), and reinstall the software by following the instructions below:
During Pixelink Capture installation
If you're installing release 10.7 (and above), click the box to Install GigE drivers, shown on the first window of the installer.
For earlier releases:
1. Select Options

2. Select GigE Driver and press "OK". This option will load the GigE driver as well as the tools for your camera.

3. Proceed with the installation. After the installation is complete, you will be able to find IP Address Tool in the Tools folder.
If you have any questions about using the IP Address tool, you can contact Pixelink Support by email at pixelink.support@ametek.com.